Lab2:系统调用
Lab2:系统调用
参考博客:https://blog.miigon.net/posts/s081-lab2-system-calls/
切换分支:syscall
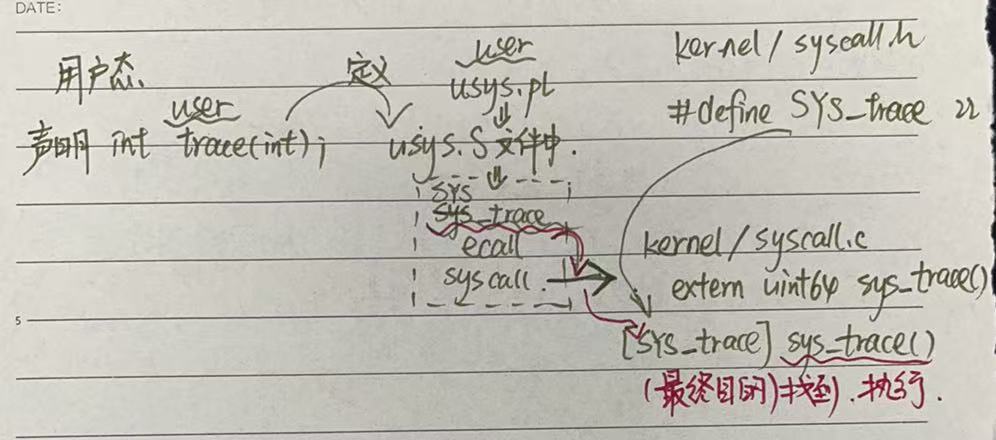
用户程序 - - (系统调用) - -→ 内核
在操作系统中,系统调用是用户程序和内核进行交互的桥梁。用户程序无法直接操作硬件,不能直接访问内核提供的资源。系统调用运行用户程序通过受控接口向内核请求服务,保持系统的安全性和稳定性。
一切为了实现用户态和内核态的良好隔离
操作系统通过CPU的特权级模式,将用户态与内核态隔离,保证了用户程序无法直接访问内核资源,避免了误操作和恶意行为。
用户 → 库函数(系统调用)→ 触发软件中断or陷阱,引发CPU切换到内核态。
内核:根据系统调用号确定要执行的服务,完成后,将结果或错误码存入用户程序寄存器。
返回用户态继续执行程序。
在上述描述中,可以发现一直在强调用户态和内核态。
在xv6系统项目中,本实验也是围绕着 user 和 kernel 两个文件夹来操作。
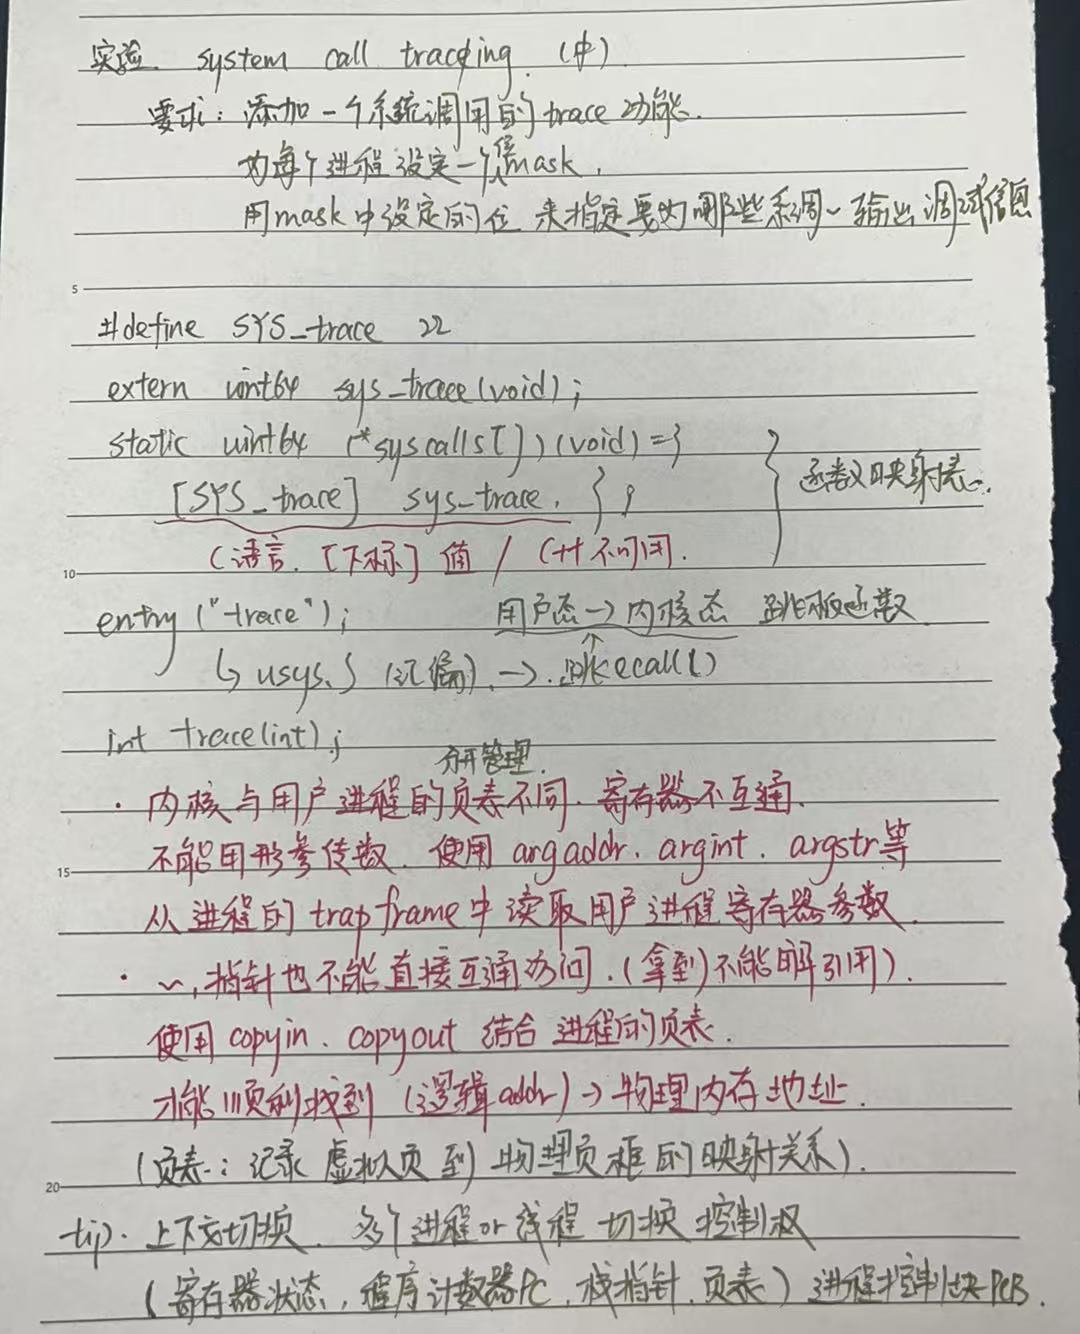
用户态中,我需要声明跳板函数。内核态中,写对应的系统调用映射(system call),这里是用的c语言的一种实现方式 static uint64 (*syscallsp[])(void) = {} ,不过原理就是通过状态码建立起与调用函数的映射关系。状态码通过 #define SYS_trace 22 实现,不过在实习中,和书中都提到过尽量避免使用define,而是选择typedef SYS_trace 22; 之类的实现方法。
如何从用户态切换到内核态?本项目使用的是Perl脚本,通过 entry("trace"); 的方式注册,大概是会被宏展开成一段汇编代码,生成 `usys.S 汇编文件,定义了每个 system call 的用户态跳板函数。
1 | |
实际上就是执行了 ecall 进入内核。
ecall(RISC-V 平台的系统调用指令),触发软件中断 trap,引导CPU进入内核态(S模式)。
ecall 触发异常,进入 kernel/trap.c 中的 usertrap() 处理。
usertrap() 发现是系统调用异常,调用 syscall() 处理。
syscall() 解析 a7 中的系统调用编号,并调用对应的 sys_exit() 等系统调用处理函数。
对于切换啰嗦了几句,再提一个更基础的知识点,就到下一个环节。
上下文切换:多个进程 or 线程切换控制权。寄存器状态、程序计数器PC、栈指针、页表;进程控制块PCB。
实验:System call tracing
In this assignment you will add a system call tracing feature that may help you when debugging later labs. You’ll create a new trace system call that will control tracing. It should take one argument, an integer “mask”, whose bits specify which system calls to trace. For example, to trace the fork system call, a program calls trace(1 « SYS_fork), where SYS_fork is a syscall number from kernel/syscall.h. You have to modify the xv6 kernel to print out a line when each system call is about to return, if the system call’s number is set in the mask. The line should contain the process id, the name of the system call and the return value; you don’t need to print the system call arguments. The trace system call should enable tracing for the process that calls it and any children that it subsequently forks, but should not affect other processes.
在本作业中,您将添加一个系统调用跟踪功能,该功能可能会在调试后续实验时为您提供帮助。您将创建一个新的跟踪系统调用,该调用将控制跟踪。它应该接受一个参数,一个整数 “mask”,其位指定要跟踪的系统调用。例如,为了跟踪 fork 系统调用,程序调用 trace(1 « SYS_fork),其中 SYS_fork 是 kernel/syscall.h 中的系统调用编号。如果在掩码中设置了系统调用的编号,则必须修改 xv6 内核以在每个系统调用即将返回时打印出一行。该行应包含进程 ID、系统调用的名称和返回值;您无需打印系统调用参数。trace 系统调用应启用对调用它的进程及其随后分叉的任何子进程的跟踪,但不应影响其他进程。
实现配置部分省略~照搬参考博客
系统调用全过程
1 | |
- 内核态与用户进程的页表不同,寄存器也不互通,所以参数无法直接通过c语言参数的形式传过来,使用argaddr、argint、argstr等系列函数,从进程的trapframe中读取用户进程寄存器中的参数。
- 内核态与用户进程的页表不同,指针也不能直接互通访问(不能直接对拿到的指针解引用),使用copyin、copyout方法结合进程的页表,顺利找到用户态指针(逻辑地址)对应的物理内存地址。
页表:记录虚拟页到物理页框的映射关系。
实验逻辑部分
1 | |
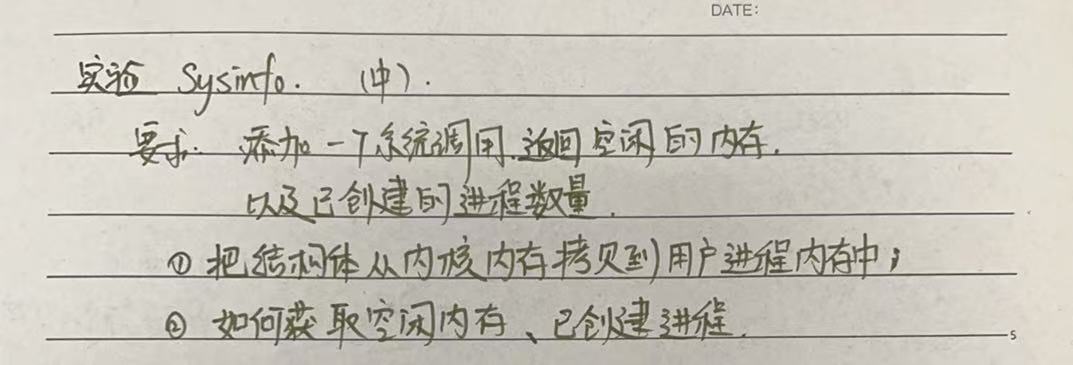
实验:Sysinfo
In this assignment you will add a system call, sysinfo, that collects information about the running system. The system call takes one argument: a pointer to a struct sysinfo (see kernel/sysinfo.h). The kernel should fill out the fields of this struct: the freemem field should be set to the number of bytes of free memory, and the nproc field should be set to the number of processes whose state is not UNUSED. We provide a test program sysinfotest; you pass this assignment if it prints “sysinfotest: OK”.
在此作业中,您将添加一个系统调用 sysinfo,用于收集有关正在运行的系统的信息。系统调用采用一个参数:指向 struct sysinfo 的指针(请参阅 kernel/sysinfo.h)。内核应该填写这个结构体的字段:freemem 字段应该被设置为空闲内存的字节数,nproc 字段应该被设置为状态不是 UNUSED 的进程数。我们提供了一个测试程序 sysinfotest;如果它打印 “sysinfotest: OK”,则通过此赋值。
1 | |
草稿图